そんな記念すべき第一回目はWebGL
WebGLってなんぞ?
フォルダ構成
こんな感じでやっていきます。
threeJsPractice
|
|-index.html
|-index.js
three.jsの導入
<!DOCTYPE html>
<html lang="en">
<head>
<meta charset="UTF-8">
<meta name="viewport"content="width=device-width, initial-scale=1.0">
<title>Document</title>
<script src="https://cdnjs.cloudflare.com/ajax/libs/three.js/r121/three.min.js"integrity="sha512-yNJzAsg5JyP91u+sLHlUDULMBd3hmEiVkYeeN1cQBKaLZ7EyT6oH2u5THNIRM2Fu6VKcZJv+F/QAp1h/qzy9Ow=="crossorigin="anonymous"></script>
<script src="./index.js"></script>
</head>
<body>
</body>
</html>
three.jsの設定
window.addEventListener('load', init);
function init() {
// シーンの作成
const scene = newTHREE.Scene();
// カメラの作成
const camera = newTHREE.PerspectiveCamera(
  75,  //視野角
  window.innerWidth / window.innerHeight,  //アスペクト比
  0.1,  カメラに映る最小距離
  1000,  カメラに映る再長距離
);
// レンダラーの作成
const renderer = newTHREE.WebGLRenderer();
renderer.setSize(window.innerWidth, window.innerHeight);
document.body.appendChild(renderer.domElement);
};
これで下準備は完了です。
いよいよ箱を作っていきましょう!
表示する箱を作成
window.addEventListener('load', init);
function init() {
// シーンの作成
const scene = newTHREE.Scene();
// カメラの作成
const camera = newTHREE.PerspectiveCamera(
  75,
  window.innerWidth / window.innerHeight,
  0.1,
  1000,
);
// レンダラーの作成
const renderer = newTHREE.WebGLRenderer();
renderer.setSize(window.innerWidth, window.innerHeight);
document.body.appendChild(renderer.domElement);
===⭐️ここから追加===
// 箱を作るために箱の頂点や面情報などの形の情報を持つBoxGetmetryオブジェクトが必要
const geometry = newTHREE.BoxGeometry();
// 今回はMeshBasicMaterial(光の影響を受けない均一な塗り潰し)の質感にカラーを指定
const material = newTHREE.MeshBasicMaterial( { color:0x00ff00 } );
// geometryをmaterialを用いて3Dオブジェクトを作成する
const cube = newTHREE.Mesh( geometry, material );
// sceneに追加
scene.add(cube);
camera.position.z = 5; // カメラの位置を設定
renderer.redner(scene, cmaera);
===⭐️ここまで追加===
};
このhtmlファイルをブラウザで表示すると緑の箱が表示されると思います。
おいおい、ただの四角が出ただけじゃないか。
こんなことならcssでかけるよ!
まぁまぁ、あわてないでください。
この四角…ただの四角ではないんです。
今の状態では平面の四角にしか見えないですが、実はちゃんと立体になっています。
それを証明するためにもアニメーションをつけて回転させてみましょう!
animationの設定
window.addEventListener('load', init);
function init() {
// シーンの作成
const scene = newTHREE.Scene();
// カメラの作成
const camera = newTHREE.PerspectiveCamera(
  75,
  window.innerWidth / window.innerHeight,
  0.1,
  1000,
);
// レンダラーの作成
const renderer = newTHREE.WebGLRenderer();
renderer.setSize(window.innerWidth, window.innerHeight);
document.body.appendChild(renderer.domElement);
// 箱を作るために箱の頂点や面情報などの形の情報を持つBoxGetmetryオブジェクトが必要
const geometry = newTHREE.BoxGeometry();
// 今回はMeshBasicMaterial(光の影響を受けない均一な塗り潰し)の質感にカラーを指定
const material = newTHREE.MeshBasicMaterial( { color:0x00ff00 } );
// geometryをmaterialを用いて3Dオブジェクトを作成する
const cube = newTHREE.Mesh( geometry, material );
// sceneに追加
scene.add(cube);
camera.position.z = 5; // カメラの位置を設定
===⭐️ここから追加===
const animate = function () {
  requestAnimationFrame(animate)
  cube.rotation.x += 0.01;
  cube.rotation.y += 0.01;
  renderer.render(scene, camera);
}
animate();
===⭐️ここまで追加===
アニメーションの設定を追加しました。
index.htmlを読み込んでみましょう!
「細かいことはいいんだよ!」精神でざっくり解説します。
画面が読み込まれる
->animate関数実行
->requestAnimationFrameでanimate関数を設定
->箱をちょっと回転
->再描画
->animate関数がもう一度実行(requestAnimationFrameで設定していたおかげ!)
->requestAnimationFrameでanimate関数を設定
->箱をちょっと回転
->再描画
->...
と繰り返されます。
✨光の追加✨
const material = new THREE.MeshLambertMaterial( { color: 0x00ff00 } );
光の反射を考えた箱ですのでもちろん光源が必要です。
three.jsには光源が用意されています。追加してみましょう!
// ライトの作成
const light = new THREE.DirectionalLight(0XFFFFFF, 1);
light.position.set(0, 10, 50);
scene.add(light);
おわりに
今回three.jsを使用して、3Dのアニメーションを作成しました。
簡単な例ですが、これからの開発に応用できそうだなと感じています。
何より作っていて楽しい!
また、Three.jsを使うのに座標の話だとか回転の話だとか、少なからず数学の知識も出てきます。
学生の頃勉強しといてよかったなーと思う瞬間でした。
「なんで数学なんて勉強するの?役に立つの?」
と聞かれても、「将来のため」と自信を持って答えられるようになりました。
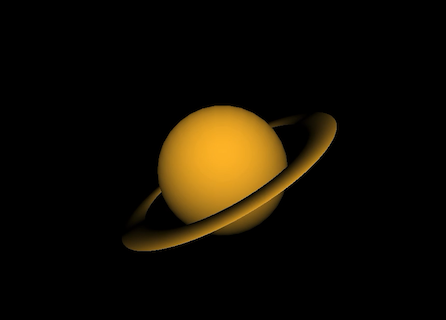
長くなるので説明までしませんが、土星のようなものも作れました。
画像を用意していないので、それっぽい色を当てただけですが、土星の表面を示す画像を作ればもっとそれっぽくできます。
three.jsには四角だけでなく球体やリングまで用意されているので、それを組み合わせれば手軽に作成できそうですね!
それでは良い開発ライフを!
andspace
この記事を書いた人


